English
 Português
 русский
 Chinese
 French
 Japanese
 Spanish

How to Use a Diamond Tile Cutter for Clean Cuts
2026-11-20 16:05:06
admin
Mastering how to use a diamond tile cutter prevents costly material waste and uneven tile edges on your job site. Whether you install dense porcelain or natural stone, understanding how to use a diamond tile cutter safely ensures fast, accurate cuts every time.
At Z-LION, we manufacture industrial-grade diamond tooling for stone fabricators and tile contractors worldwide. This guide walks you through machine setup, step-by-step cutting techniques, and maintenance practices to achieve chip-free edges.
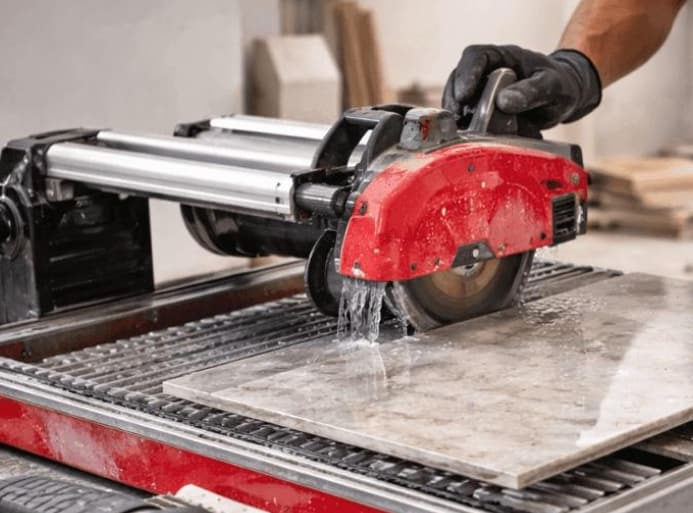
What Is a Diamond Tile Cutter and How Does It Work
A diamond tile cutter is a motorized cutting machine equipped with a metal-bonded diamond blade. Unlike standard steel teeth that tear through wood, a diamond blade grinds away hard tile surfaces using industrial diamond grits exposed along its rim.
You will encounter three primary types of tile cutting tools on job sites:
Electric Tile Cutter (Portable): A compact, handheld or tabletop saw designed for quick trim work and onsite adjustments.
Wet Tile Saw: A stationary, heavy-duty machine featuring a sliding table and an integrated water pump for cooling and dust suppression.
Manual Tile Cutter: A non-motorized score-and-snap rail tool suitable only for thin, straight ceramic cuts.
This guide focuses on motorized electric tile cutters and wet tile saws, as these machines deliver the precision required for hard porcelain and thick natural stone.
What Do You Need Before Cutting Tiles
Proper preparation directly determines your cut quality and operator safety. Before turning on your machine, verify your blade selection, equipment setup, and protective gear.
Choose the Right Diamond Tile Blade
Selecting the correct diamond tile cutting blade is critical because different tile densities react differently to blade bond hardness and rim geometry. Matching the blade structure to your material prevents overheating and edge chipping.
Blade Rim Type Best Tile Material Cutting Characteristic Water Requirement Continuous Rim Ceramic, Porcelain, Glass Smooth, chip-free finish; slower feed rate Wet cutting required Turbo Rim Porcelain, Marble, Granite Fast cutting speed with clean edges Wet or dry cutting Segmented Rim Thick Natural Stone, Pavers Aggressive material removal; rougher edge Wet or dry cutting
Always verify that your blade's outer diameter and arbor bore match your tile saw's specifications. Never exceed the maximum RPM rating stamped on the blade core.
Prepare the Tile and Cutting Machine
Follow this pre-cut checklist to ensure mechanical stability and accuracy:
Measure and Mark: Use a waterproof wax pencil or fine-tip marker so your cut line stays visible under running water.
Inspect Blade Mounting: Confirm the blade sits flush against the inner flange and tighten the arbor nut securely. Check that the directional arrow matches the motor's rotation.
Test Water Flow: Fill the water tray with clean water and verify that the pump delivers a steady stream to both sides of the blade.
Check Table Alignment: Ensure the sliding tray moves smoothly without lateral wobble and that the rip fence locks squarely at 90 degrees.
Prepare Safety Equipment
Cutting hard tiles generates high-speed debris, loud noise, and fine silica particles. Equip yourself with the following personal protective equipment (PPE) before starting:
Safety Goggles: ANSI-rated splash goggles protect your eyes from water spray and flying tile chips.
Hearing Protection: Earmuffs or earplugs shield against sustained high-decibel motor noise.
Respiratory Protection: An N95 or P100 respirator prevents inhalation of crystalline silica dust, especially during dry trimming.
Cut-Resistant Gloves: Wear snug-fitting gloves when handling sharp, freshly cut tile edges, but avoid loose gloves near spinning blades.
How to Use a Diamond Tile Cutter Step by Step
Follow this five-step operating procedure to achieve straight, clean cuts on your wet tile saw or electric cutter.
Step 1: Measure and Mark the Tile
Measure your installation space carefully and transfer the exact dimensions onto the glazed face of the tile. Use a straightedge to draw a crisp, continuous reference line. Account for your blade's kerf width (typically 1.6 mm to 2.2 mm) so you cut on the waste side of your mark.
Step 2: Set Up the Diamond Blade and Water Supply
Lower the cutting head to the proper depth so the blade extends roughly 3 mm to 6 mm below the bottom surface of the tile. Turn on the water pump and wait until water fully coats the blade rim. Proper lubrication prevents thermal shock and keeps the diamond matrix cool.
Step 3: Position the Tile Properly
Place the tile flat against the saw table with the glazed surface facing upward. Rest the back edge firmly against the rip fence or miter guide. Slide the table forward until the blade sits just short of the tile's leading edge, confirming exact alignment with your marked line.
Step 4: Start Cutting Slowly and Steadily
Switch on the saw motor and allow the blade to reach full operating speed for three to five seconds. Push the sliding table forward using smooth, even pressure. Let the diamond grits grind through the tile naturally; never force the material into the blade.
Step 5: Finish and Inspect the Cut Edge
As you reach the final inch of the cut, slow your feed rate slightly to prevent the back corner from snapping off. Turn off the motor and wait for the blade to stop completely before removing the tile. Inspect the cut edge for micro-chips and smooth minor roughness using a diamond hand polishing pad.
How to Maintain a Diamond Tile Cutting Blade
Routine maintenance extends blade lifespan and preserves cutting speed across multiple projects.
Clean the Blade After Use
Rinse the blade with clean water immediately after finishing your cuts to remove dried tile sludge from the core and gullets. Baked-on ceramic residue creates friction and causes the blade to wander during subsequent cuts.
Check for Wear and Damage
Inspect the blade before every shift for missing diamond segments, steel core warping, or hairline cracks near the arbor hole. Replace any damaged blade immediately, as a warped core causes severe vibration and ruins tile edges.
Use Proper Blade Maintenance and Storage
If your blade feels dull and stops cutting efficiently, make two or three shallow passes through an aluminum oxide dressing stone. This removes glazed metal bond and exposes sharp new diamond grits. Dry the blade thoroughly and hang it flat in a dry storage rack to prevent warping.
Summary
Applying proper technique when learning how to use a diamond tile cutter protects your materials and speeds up installation timelines. However, achieving factory-clean edges on ultra-hard porcelain and sintered stone ultimately depends on the quality of your diamond tooling.
If you need high-precision blades tailored to specific tile materials or commercial saw equipment, consult our technical specialists at Z-LION to discuss custom specifications or request a direct B2B quote.
Frequently Asked Questions
What type of diamond blade is best for cutting porcelain tiles?
A thin-kerf continuous rim or fine-mesh turbo rim diamond blade is best for cutting porcelain tiles. These designs minimize vibration and prevent chipping on hard, brittle porcelain glazes.
Should you use water when cutting tiles with a diamond blade?
Yes, you should use water whenever cutting ceramic, porcelain, or glass tiles. Water cools the diamond rim, prevents tile cracking from thermal stress, extends blade life, and suppresses hazardous silica dust.
How long does a diamond tile cutting blade last?
A quality diamond tile cutting blade typically lasts between 1,000 and 3,000 linear feet of cutting, depending on tile hardness, blade bond quality, and consistent water cooling during operation.